Machining chatter. It’s the bane of machinists everywhere, yet everyone will have to deal with it at some point. It can be very difficult to find the root cause, especially without the right tools, and it often goes unnoticed until chatter marks are visible on finished parts.
In this blog, we’ll do a deep dive into machining chatter and chatter marks, what causes them, how to diagnose the cause, and, most importantly, how to best prevent these issues from recurring.
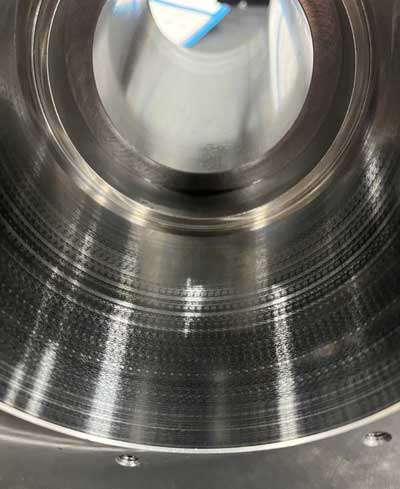
What are Chatter Marks?
Vibration is inherent in industrial processes — many pieces of equipment used in modern machining spaces generate some level of vibration when in use. The equipment manufacturer typically accounts for these vibrations.
Occasionally, however, machinery begins to vibrate in ways that are not intended and have not been accounted for in the design process. These unwanted vibrations are called machine chatter or machining chatter.
Left unchecked, these vibrations will grow and worsen to the point where they become visible in the completed workpieces. These marks are what we call chatter marks — unwanted cutting patterns that are visible on tooled portions of a workpiece.
Aside from resulting in substandard or even completely out-of-spec parts, unattended machining chatter has a number of negative side effects:
- Disproportionate and uneven tool wear
- Damage to machines and machine tools
- Slower work rates, which increases production cost
- Material and energy waste
Types of Machining Chatter & Their Causes
Machining chatter comes in two broad categories: primary and secondary chatter.
Primary chatter includes vibrations that stem from the cutting process itself. They are often, but not always, caused by tools that have worn unevenly. Different types of primary chatter include:
- Friction chatter — caused most often by uneven friction between workpiece and tool
- Thermo-mechanical chatter — caused by temperature and strain rate variations in the plastic deformation zone of a workpiece material
- Mode coupling chatter — caused when one vibration (typically in the thrust force direction) causes a secondary vibration (in the cutting force direction) or vice versa
Secondary chatter primarily includes vibrations that stem from uneven workpiece surfaces. They are known by a few different names — regenerative, resonance, and self-excited chatter — and occur when undulations on the surface of a workpiece cause a vibration in the tool. This vibration then spreads throughout the machine and builds as it goes. In other words, it resonates.
Preventing Chatter and Chatter Marks
Chatter is very difficult to prevent outright. As mentioned, vibrations are innate to the operation of industrial machinery: no tool wears exactly as anticipated, no raw material is completely uniform throughout, no part blank is perfectly proportioned, and so on.
That said, there are some things you can do to minimize the chance that chatter occurs and thereby reduce the rate at which chatter marks appear.
Tooling
There is a right tool for every job, and there are also close-enough tools. It can be tempting, whether for ease or cost, to settle for a close-enough tool for a job, but you’ll be at greater risk of developing chatter and chatter marks. A tool’s substrate, coating, and aspect ratio are just a few considerations. Size and shape are important considerations as well — a longer, thinner tool will vibrate much more readily than a stouter one.
Workholding
The workholding solution you use for a job is also very important, as incorrect position, poor fit, and fixture type will all affect how firmly a workpiece is held and, therefore, how much it vibrates while being machined.
Set Up & Strategy
If a machine is set up correctly — on a flat surface free of imperfections, anchored correctly, and regularly balanced and maintained — you lower your risk of developing chatter and chatter marks. Machining strategy is also important, as workpiece material, RPM, cutting path, degree of cutter engagement, and a host of other workpiece-tool touchpoints can lead to unwanted vibrations.
Vibration Analysis
While the above considerations and strategies can help to reduce the possibility of machining chatter and resultant chatter marks, they cannot completely eliminate it. Despite your best efforts, your machines will encounter unwanted vibrations at times.
That is why the best defense against chatter marks is a good offense — specifically in the form of vibration analysis.
Every machine has a telltale vibration pattern when operating smoothly. In the same way, each type of machining chatter has its own telltale vibration pattern. With a vibration analysis tool like VibePro, you can identify emerging chatter patterns before they worsen to the point of causing chatter marks. Then, rectifying the issue becomes as simple as identifying the type of chatter and alleviating or compensating for the root cause.
Machining chatter remains a headache for manufacturers. While completely eliminating it is rather difficult, savvy manufacturers can fight back by choosing quality tools, optimizing their setup, and using vibration analysis to catch problems before they spiral out of control. This is the key to minimizing chatter marks and other potential part quality issues.